


NIO可以理解为Non-Blocking IO,也可以理解为New IO,是jdk在老版本的BIO基础上增加的一种新IO,其体系是与老的BIO完全独立的
顾名思义,NIO是非阻塞同步IO
NIO有三大核心设计理念:缓冲区Buffer、通道Channel、选择器Selector。如果把NIO比喻成电车,数据两端的Client和Server是车站,Buffer是电车,Channel是轨道。
缓冲区Buffer
Buffer概念
Buffer是NIO链路中的数据交换载体,载着一批数据“乘客”
Buffer在JDK中是一个顶层抽象类,其子类按照承载数据差异,实现了CharBuffer、FloatBuffer、ByteBuffer、IntBuffer、LongBuffer、ShortBuffer、DoubleBuffer等
其中ByteBuffer是通用实现,功能较多,比较核心。其他几种都比较类似。
Buffer的核心设计思路
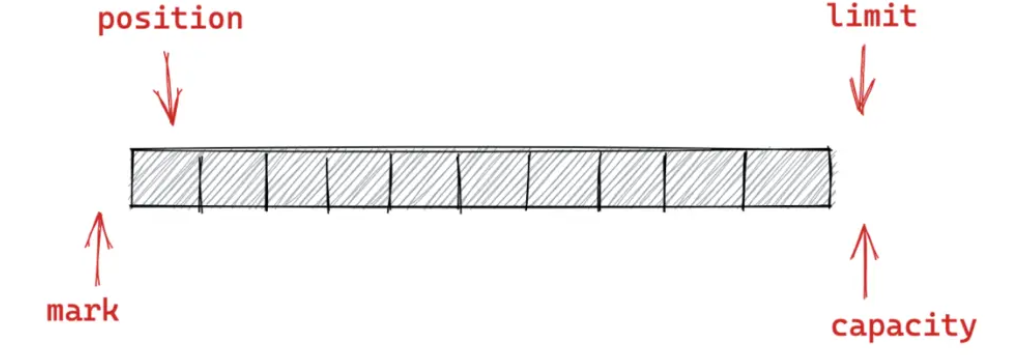
通过四个指针的移动进行数据读写标记
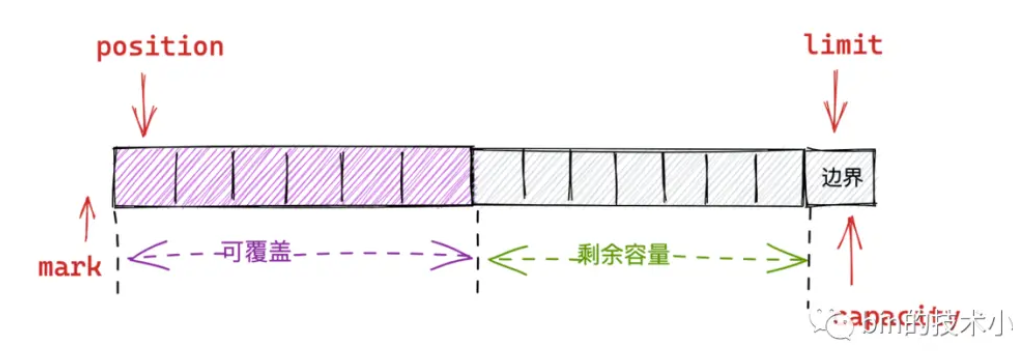
四个核心指针
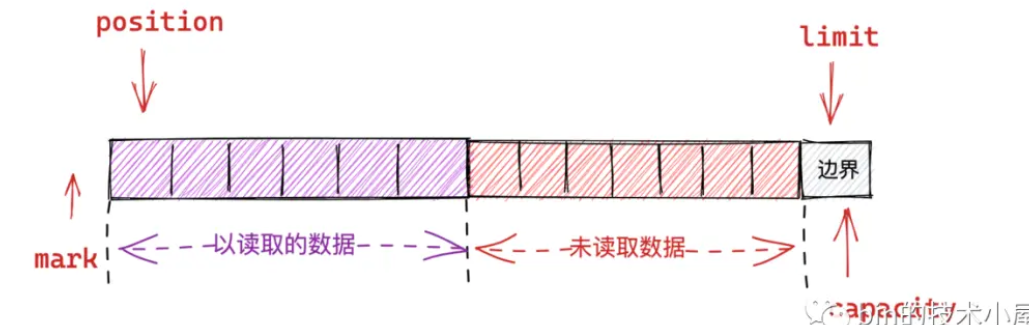
容量capacity:缓冲区支持的最大容量。缓冲区不能为负,且创建后不能更改
界限limit:表示缓冲区可以操作数据的大小,后边是不能写数据的。缓冲区的限制不能为负,并且不能大于缓冲区的容量。写入模式,限制buffer的容量。在读取模式下,limit等于写入的数据量
位置position:下一个要读取或写入数据的索引。缓冲区位置不能为负,并且不能大于其限制
标记mark:用于标记 Buffer 当前 position 的位置。这个字段在我们对网络数据包解码的时候非常有用
标记、位置、限制、容量遵循以下不等式:0 <= mark <= position <= limit <= capacity
可以看到源码中的属性配置
// Invariants: mark <= position <= limit <= capacity
private int mark = -1;
private int position = 0;
private int limit;
private int capacity;
两个核心方法
标记mar和重置reset:标记是一个索引,通过Buffer中的
mark()方法指向Buffer中的一个特定的position,之后可以通过调用reset()方法恢复到这个位置的position。
数据读写时的指针移动和源码分析
Buffer clear()  // 清空缓冲区并返回对缓冲区的引用
Buffer flip()  //   将缓冲区的界限设置为当前位置,并将当前位置重置为 0
int capacity()  // 返回 Buffer的capacity 大小
boolean hasRemaining()  // 判断缓冲区中是否还有元素
int limit()  // 返回 Buffer 的界限(limit)  // 的位置
Buffer limit(int n)  // 将设置缓冲区界限为 n,并返回一个具有新 limit 的缓冲区对象
Buffer mark()  // 对缓冲区设置标记
int position()  // 返回缓冲区的当前位置 position
Buffer position(int n)  // 将设置缓冲区的当前位置为 n,并返回修改后的 Buffer 对象
int remaining()  // 返回 position 和 limit 之间的元素个数
Buffer reset()  // 将位置 position 转到以前设置的mark所在的位置
Buffer rewind()  // 将位置设为为 0, 取消设置的 mark
构造buffer的初始位置
构造 Buffer 的主要逻辑就是根据用户指定的参数来初始化 Buffer 中的这四个重要属性:mark,position,limit,capacity。它们之间的关系为:mark <= position <= limit <= capacity 。其中 mark 初始默认为 -1,position 初始默认为 0
Buffer(int mark, int pos, int lim, int cap, MemorySegmentProxy segment) {       // package-private
    if (cap < 0)
        throw createCapacityException(cap);
    this.capacity = cap;
    this.segment = segment;
    limit(lim);
    position(pos);
    if (mark >= 0) {
        if (mark > pos)
            throw new IllegalArgumentException("mark > position: ("
                                               + mark + " > " + pos + ")");
        this.mark = mark;
    }
}
可以看到,如果构造时传入了lim和pos,走初始化方法,如果不传,直接按默认值处理
public Buffer limit(int newLimit) {
    if (newLimit > capacity | newLimit < 0)
        throw createLimitException(newLimit);
    limit = newLimit;
    if (position > newLimit) position = newLimit;
    if (mark > newLimit) mark = -1;
    return this;
}

public Buffer position(int newPosition) {
    if (newPosition > limit | newPosition < 0)
        throw createPositionException(newPosition);
    if (mark > newPosition) mark = -1;
    position = newPosition;
    return this;
}limit()和position(),主要是为了满足mark <= position <= limit <= capacity这个条件的
存入数据后position位置移动
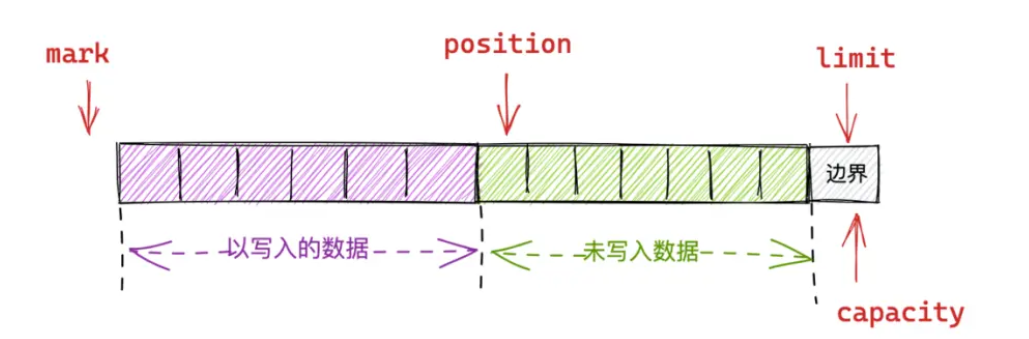
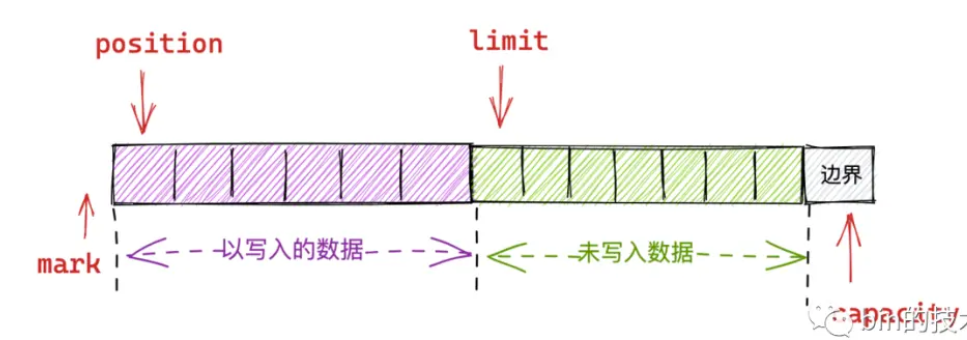
flip - 切换读模式
public Buffer flip() {
    limit = position;
    position = 0;
    mark = -1;
    return this;
}
limit来到position位置,即可读内容就是写入的最后一位。position变为读位置,归零
用图来表示就是:
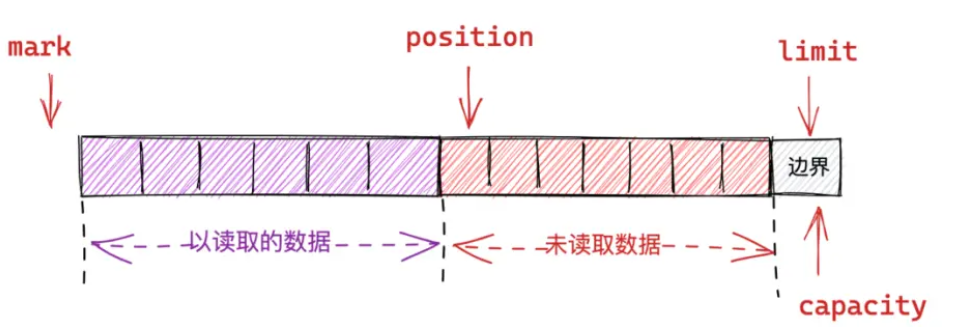
rewind - 重读
public Buffer rewind() {
    position = 0;
    mark = -1;
    return this;
}
position、mark归零,limit不动,因此只是重置了读指针
比如一个读取到一半的数据状态为
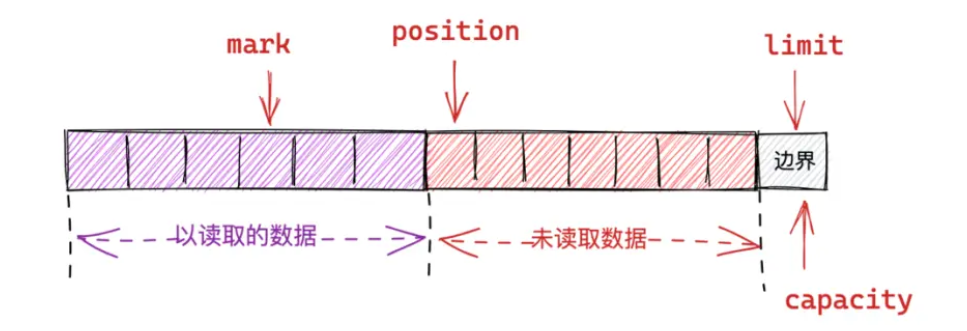
执行重读后position回归零,变成
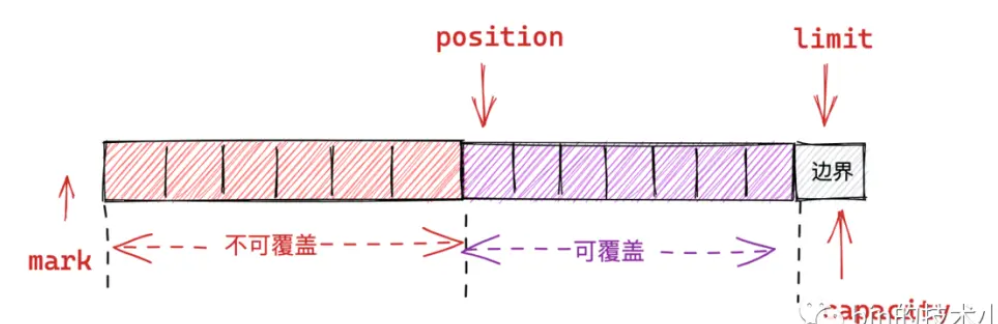
compact - 切换续写模式
compact的作用是保留position位置,续写,与clear的区别在于一个重置position,一个不重置
以HeapByteBuffer为例
public ByteBuffer compact() {
    int pos = position();
    int lim = limit();
    assert (pos <= lim);
    int rem = (pos <= lim ? lim - pos : 0);
    System.arraycopy(hb, ix(pos), hb, ix(0), rem);
    position(rem);
    limit(capacity());
    discardMark();
    return this;
}
图解可以理解为初始状态
执行compact后position位置不变
clear - 清空并回归写模式
public Buffer clear() {
    position = 0;
    limit = capacity;
    mark = -1;
    return this;
}
position、mark归零,limit回到capacity,这时buffer回归写模式
用图表示就是:
初始状态
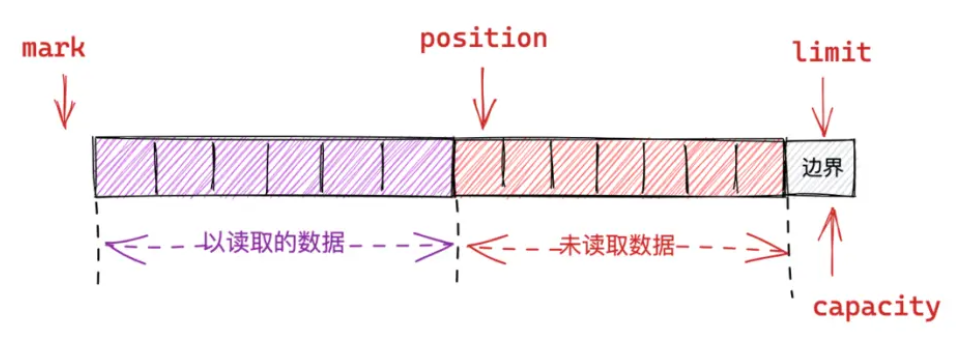
执行clear后
ByteBuffer - 通用实现
编码思路
申请内存地址
调用
put()写入数据到Buffer调用
flip()方法,将Buffer从写模式切换到读模式调用
get()从Buffer中读取数据,调用rewind()重读调用
clear()方法或者compact()方法清空buffer
public static void bufferTest(){
    //1. 分配一个指定大小的缓冲区
    ByteBuffer buf = ByteBuffer.allocate(1024);
    System.out.println("-----------------allocate()----------------");
    System.out.println(buf.position());  //返回缓冲区的当前位置 0
    System.out.println(buf.limit());     //界限(limit) 的位置 1024
    System.out.println(buf.capacity()); // Buffer的capacity 大小 1024
    // 2.put向缓冲区中添加数据,利用 put() 存入数据到缓冲区中
    String str = "qcby";
    buf.put(str.getBytes());
    // positon 4 limit 1024 capacity 104
    //3. 切换读取数据模式
    buf.flip();
    // positon 0 limit 4 capacity 104
    //这种读取不可重复读
    System.out.println("-----------------get()----------------");
    //4. 利用 get() 读取缓冲区中的数据 ---- 前提是必须切换为读取模式
    byte[] dst = new byte[buf.limit()];
    buf.get(dst);
    System.out.println(new String(dst, 0, dst.length));
    // positon 4 limit 4 capacity 104
    System.out.println("-----------------rewind()----------------");
    //5. rewind() : 可重复读
    buf.rewind();
    byte[] dst1 = new byte[buf.limit()];
    buf.get(dst1);
    // positon 4 limit 4 capacity 104
    //6. clear() : 清空缓冲区. 但是缓冲区中的数据依然存在,但是处于“被遗忘”状态
    buf.clear();
    System.out.println("-----------------clear()----------------");
    // positon 0 limit 1024 capacity 104
    System.out.println((char)buf.get()); // q
}
源码走读
allocate与allocateDirect
申请空间分别有堆内存和直接内存两种
public static ByteBuffer allocate(int capacity) {
    if (capacity < 0)
        throw createCapacityException(capacity);
    return new HeapByteBuffer(capacity, capacity, null);
}
allocate申请堆内存,调用的ByteBuffer子类HeapByteBuffer
public static ByteBuffer allocateDirect(int capacity) {
    return new DirectByteBuffer(capacity);
}
allocateDirect申请堆内存,调用的ByteBuffer子类DirectByteBuffer
DirectByteBuffer(int cap) {                   // package-private
    super(-1, 0, cap, cap, null);
    boolean pa = VM.isDirectMemoryPageAligned();
    int ps = Bits.pageSize();
    long size = Math.max(1L, (long)cap + (pa ? ps : 0));
    // 首先做一次内存判断和清理
    Bits.reserveMemory(size, cap);
    long base = 0;
    try {
        // 申请内存
        base = UNSAFE.allocateMemory(size);
    } catch (OutOfMemoryError x) {
        Bits.unreserveMemory(size, cap);
        throw x;
    }
    UNSAFE.setMemory(base, size, (byte) 0);
    if (pa && (base % ps != 0)) {
        // Round up to page boundary
        address = base + ps - (base & (ps - 1));
    } else {
        address = base;
    }
    cleaner = Cleaner.create(this, new Deallocator(base, size, cap));
    att = null;
}可以看到DirectByteBuffer调用UNSAFE.allocateMemory(size)申请直接内存之前,先调用Bits.reserveMemory(size, cap)做一次直接内存的判断和回收操作
static void reserveMemory(long size, long cap) {
    if (!MEMORY_LIMIT_SET && VM.initLevel() >= 1) {
        MAX_MEMORY = VM.maxDirectMemory();
        MEMORY_LIMIT_SET = true;
    }
    // optimist!
    if (tryReserveMemory(size, cap)) {
        return;
    }
    ……
System.gc();reserveMemroy()方法会首先判断内存中设置的直接内存限制:-XX:MaxDirectMemorySize
调用tryReserveMemory()方法基于此设置判断目前申请是否还能申请到,如果能,直接return返回,如果申请不到,显式执行System.gc()触发一次fullgc,因为直接内存回收只能通过fullgc完成
这就是使用NIO容易触发直接内存泄露的根本原因:
使用
+XX:+DisableExplicitGC参数会使System.gc()空跑,不触发fullgc,减少STW的频率和时长,但是在大量使用NIO的场景中,可能会导致直接内存泄露,导致java.lang.OutOfMemoryError:Direct buffer memory或k8sOOMKilled不使用+XX:+DisableExplicitGC参数将正常触发fullgc,减少NIO直接内存泄露风险 JVM_END
# 实际上是System.gc()调用JVM_ENTRY_NO_ENV空跑
JVM_ENTRY_NO_ENV(void, JVM_GC(void))
    JVMWrapper("JVM_GC");
    if (!DisableExplicitGC) {
        Universe::heap()->collect(GCCause::_java_lang_system_gc);
    }
get与put
也分别有堆内存和直接内存两种
public ByteBuffer put(byte x) {
    hb[ix(nextPutIndex())] = x;
    return this;
}

public byte get() {
    return hb[ix(nextGetIndex())];
}
HeapByteBuffer直接向成员变量里面存取
public abstract class ByteBuffer
    extends Buffer
    implements Comparable<ByteBuffer>
{

    final byte[] hb;                  // Non-null only for heap buffers
这个数组定义在ByteBuffer里面,继承来的
public ByteBuffer put(byte x) {
    try {
        SCOPED_MEMORY_ACCESS.putByte(scope(), null, ix(nextPutIndex()), ((x)));
    } finally {
        Reference.reachabilityFence(this);
    }
    return this;
]

public byte get() {
    try {
        return ((SCOPED_MEMORY_ACCESS.getByte(scope(), null, ix(nextGetIndex()))));
    } finally {
        Reference.reachabilityFence(this);
    }
}
DirectByteBuffer基于ScopedMemoryAccess类存取,是一个做内存管理的工具类
wrap
public static ByteBuffer wrap(byte[] array, int offset, int length){
    try {
        return new HeapByteBuffer(array, offset, length, null);
静态方法wrap的作用是将一个字节数组包装成Bytebuffer,例如:
Bytebuffer buffer = ByteBuffer.wrap("some text".getBytes());此时获取的buffer是读状态的
System.out.println(buffer.limit());   // 9
System.out.println(buffer.capacity());  // 9
System.out.println(buffer.position());  // 0
因为可以看到,且limit和capacity在一起,意味着bytebuffer就这么大
如果选三个入参的方法:
ByteBuffer buffer = ByteBuffer.wrap("some text".getBytes(), 2, 5);参数2offset实际调整的是position的位置,而参数3legth实际调整的是limit的位置,参考构造函数:
HeapByteBuffer(byte[] buf, int off, int len, MemorySegmentProxy segment) { // package-private
    super(-1, off, off + len, buf.length, buf, 0, segment);
这时构造出来的读状态的byteBuffer,position在2,limit为7,即存入的数据为"some te",因为position并未影响开头部分的存入,但是limit影响了实际存入到哪里
buffer间的数据类型转换
基本数据类型转换
Buffer还有很多实现,例如IntBuffer、ShortBuffer等,可以通过视图buffer的形式,以ByteBuffer操作基本数据类型Buffer
例如:
ByteBuffer buffer = ByteBuffer.allocate(1024);
IntBuffer intBuffer = buffer.asIntBuffer();
System.out.println(buffer.position());    // 0
System.out.println(intBuffer.position());  // 0
// buffer.asIntBuffer().put(1234565);
intBuffer.put(12345656);
System.out.println(buffer.position());  // 0
System.out.println(intBuffer.position());  // 1
System.out.println(buffer.getInt()); // 12345656可以看到,bytebuffer承担了一个视图的能力,可以看到put和get操作好像都是在buffer上做的,但实际数据是存储在intBuffer里面(因为bytebuffer.position结果实际是0)
字符类型编码
字符类型转成二进制的bytebuffer,还需要指定编码和解码,否则转回字符,读取会出错
例如:
ByteBuffer buffer = ByteBuffer.wrap("some text".getBytes(), 0, 6);
System.out.println(buffer.limit());   // 6
System.out.println(buffer.capacity());  // 9
System.out.println(buffer.position());  // 0
buffer.rewind();
System.out.println(buffer.asCharBuffer());  // 獯浥⁴
System.out.println(Charset.defaultCharset().decode(buffer));  // some t
Charset类提供了编码的能力,使用默认charset可以解码正常的英文,或者指定charset
System.out.println(Charset.forName("utf-8").decode(buffer));MappedByteBuffer - 内存映射文件
MappedByteBuffer的原理
MappedByteBuffer继承自ByteBuffer,且是DirectByteBuffer的抽象父类
它的意义在于允许我们创建和修改那些因为太大而不能放入内存的文件。有了内存映射文件,我们就可以假定整个文件都放在内存中,而且完全把它当做一个非常大的数组来访问
例如以较小的内存访问128M乃至2G的文件
MappedByteBuffer的原理是基于虚拟内存(见内存章节),通过FileChannel#map方法(见FileChannel部分)把文件映射到虚拟内存,这时就让原始文件承担了物理内存的慢速存储设备的功能(替代了硬盘上的交换区),当申请的内容在虚拟内存中存在,但实际的物理内存中还没有的话,抛出缺页异常,进行swap in,获得下一部分内存
使用案例如下:
public class MappedByteBufferTest {
    public static void main(String[] args) {
        File file = new File("D://data.txt");
        long len = file.length();
        byte[] ds = new byte[(int) len];

        try {
            MappedByteBuffer mappedByteBuffer = new RandomAccessFile(file, "r")
                    .getChannel()
                    .map(FileChannel.MapMode.READ_ONLY, 0, len);
            for (int offset = 0; offset < len; offset++) {
                byte b = mappedByteBuffer.get();
                ds[offset] = b;
            }

            Scanner scan = new Scanner(new ByteArrayInputStream(ds)).useDelimiter(" ");
            while (scan.hasNext()) {
                System.out.print(scan.next() + " ");
            }

        } catch (IOException e) {}
    }
}
源码分析
还记得DirectByteBuffer执行get方法的时候是基于ScopedMemoryAccess类的,底层实际是调用UNSAFE#getByte方法操作的直接内存
private byte getByteInternal(Scope scope, Object base, long offset) {
    try {
        if (scope != null) {
            scope.checkValidState();
        }
        return UNSAFE.getByte(base, offset);
    } finally {
        Reference.reachabilityFence(scope);
    }
}既然操作直接内存,就需要有一个对应的虚拟内存页号作为查询依据。因此看下MappedByteBuffer#get方法在DirectByteBuffer中的实现:
return ((SCOPED_MEMORY_ACCESS.getByte(scope(), null, ix(nextGetIndex()))));这里调用了ix方法和nextGetIndex方法,先看ix方法
private long ix(int i) {
    return address + ((long)i << 0);
}其中address就是ByteBuffer中维护的address变量,其实就是存储了一个虚拟内存地址,这样就无需调用read或write方法对文件进行读写,通过address就能够操作文件。
再看nextGetIndex方法
final int nextGetIndex() {                          // package-private
    int p = position;
    if (p >= limit)
        throw new BufferUnderflowException();
    position = p + 1;
    return p;
}
实际上就是找到当前位置position,即把position当成内存寻址中的偏移量,通过address+position,可以确定物理内存对应位置上的数据
HeapByteBuffer与DirectByteBuffer的隐藏逻辑
因为虚拟内存的存在,HeapByteBuffer 和 DirectByteBuffer 从本质上来说均是 JVM 进程地址空间内的一段虚拟内存
对于 Java 程序来说 HeapByteBuffer 被用来特定表示 JVM 堆中的内存,而 DirectByteBuffer 就是调用native的 C++ 方法通过 malloc 系统调用向操作系统申请的一段 Native Memory ,位于 JVM 堆之外,即堆外内存。
因此HeapByteBuffer是会被各种GC管理的,而DirectByteBuffer则只会收到FullGC影响
如果在读写HeapByteBuffer时发生了YoungGC,是并不会百分之百做Stop The World的,那么它写的时候,物理地址就可能会并发发生变化,那么在通过NIO做文件写出的时候,可能就会写错。为了规避这一点,使用HeapByteBuffer的时候,实际也构造了一个临时的DirectByteBuffer作为中转。
从HeapByteBuffer到中转DirectByteBuffer的过程使用Unsafe#copyMemory 方法来实现,这个方法是以不会发生GC作为前提的
通道Channel
Channel用于在目标端和源端之间架设一条传递Buffer数据的通道
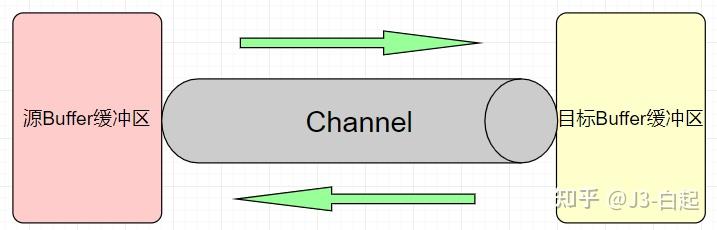
需要注意的是:Channle只能与Buffer进行交互
NIO中Channel与BIO中stream的差异
NIO中的Channel可以从缓冲区同时进行读写,可以实现异步读写,而且channel可以针对一个buffer进行读和写,也支持从一个buffer读写到另一个buffer
stream是严格分成InputStream和OutputStream的,字符流Reader和Writer也同理
Channel接口
public interface Channel extends Closeable {

    public boolean isOpen();

    public void close() throws IOException;
}
只提供了判断开启和关闭两个抽象方法
Channel接口常用的实现类包括:
FileChannel:用于读取、写入、映射和操作文件通道
DatagramChannel:通过UDP读写网络中的数据通道
SocketChannel:通过TCP读取网络中的数据
ServerSocketChannel:可以监听新进来的 TCP 连接,对每一个新进来的连接都会创建SocketChannel
FileChannel
常用方法
int read(ByteBuffer dst)  // 从Channel到中读取数据到ByteBuffer
long  read(ByteBuffer[] dsts) // 将Channel到中的数据“分散”到ByteBuffer[]
int  write(ByteBuffer src)  // 将ByteBuffer 到中的数据写入到  Channel
long write(ByteBuffer[] srcs)  // 将ByteBuffer[] 到中的数据“聚集”到  Channel
long position()  // 返回此通道的文件位置
FileChannel position(long p)  // 设置此通道的文件位置
long size()  // 返回此通道的文件的当前大小
FileChannel truncate(long s)  // 将此通道的文件截取为给定大小
void force(boolean metaData)  // 强制将所有对此通道的文件更新写入到存储设备中
案例
FileChannel的开发流程是:
使用支持Channel的对象的
getChannel()方法获取通道,例如FileInputStream、FileOutputStream、RandomAccessFile、DatagramSocket、Socket、ServerSocket等使用channel的
read()和write()方法从buffer中读写数据
private static void bufferTest() {
    try {
        // 通过FileChannel将内存中的字符串写入txt
        FileOutputStream fos = new FileOutputStream("D:\\input.txt");
        ByteBuffer bufferOut = ByteBuffer.allocate(1024);
        bufferOut.put("Hello World".getBytes());
        bufferOut.flip();
        FileChannel channelOut = fos.getChannel();
        channelOut.write(bufferOut);
        channelOut.close();

        // 通过FileChannel读取txt中的字符串文本
        FileInputStream fis = new FileInputStream("D:\\input.txt");
        FileChannel channelIn = fis.getChannel();
        ByteBuffer bufferIn = ByteBuffer.allocate(1024);
        channelIn.read(bufferIn);
        bufferIn.flip();
        String s = new String(bufferIn.array(), 0, bufferIn.remaining());
        System.out.println(s);
    } catch (IOException e) {
        throw new RuntimeException(e);
    }
}
源码走读
FileChannel本身也是一个抽象类,实现类有FileChannelImpl等
apache.sshd组件也是基于FileChannel的实现类SftpRemotePathChannel
read方法
以FileChannelImpl为例,除了外面做并发控制的代码,其核心逻辑委托给IOUtil#read()
public int read(ByteBuffer dst) throws IOException {
    ……
    do {
        n = IOUtil.read(fd, dst, -1, direct, alignment, nd);
} while ((n == IOStatus.INTERRUPTED) && isOpen());其中fd是FileDescriptor对象,了解它的构造逻辑,可以找一个getChannel()方法向上看,例如在FileInputStream中
public FileChannel getChannel() {
    ……
                this.channel = fc = FileChannelImpl.open(fd, path, true,
                    false, false, this);
这里取的还是自己的成员属性,再往上看就到了FileInputstream的构造方法
public FileInputStream(File file) throws FileNotFoundException {
    ……  // 只看核心部分
    fd = new FileDescriptor();
    fd.attach(this);
    path = name;
    open(name);
    FileCleanable.register(fd);       // open set the fd, register the cleanup
}可以看到fd是空对象通过attach()方法挂到流上面的,可以认为它是FileInputStream的代表
dst是ByteBuffer入参进来的
这样可以理解read方法就是从源头的FileInputStream读数据到dst
IOUtil是NIO提供的读写使用的工具类,看IOUtil#read方法
static int read(FileDescriptor fd, ByteBuffer dst, long position,
                boolean directIO, boolean async,
                int alignment, NativeDispatcher nd)
    throws IOException
{
    ……
    ByteBuffer bb;
    ……
    try {
        // 从fd中读取数据
        int n = readIntoNativeBuffer(fd, bb, position, directIO, async, alignment, nd);
        bb.flip();
        if (n > 0)
            dst.put(bb);
        return n;
    ……
可以看出来,首先从fd把数据读到bb,然后把bb存入dst,底层实际用的就是NIO的put方法,比较简单
write方法
思路与read基本是一致的,首先委托给IOUtil#write()方法
public int write(ByteBuffer src) throws IOException {
    ……
            do {
                n = IOUtil.write(fd, src, -1, direct, alignment, nd);
            } while ((n == IOStatus.INTERRUPTED) && isOpen());
            return IOStatus.normalize(n);
其中src是从ByteBuffer取的数据,要写入到fd
然后在IOUtil#write() 中使用put方法,只不过与read相比这次是bb.put(src)反过来了
static int write(FileDescriptor fd, ByteBuffer src, long position,
                 boolean directIO, boolean async, int alignment,
                 NativeDispatcher nd)
    throws IOException
{
    ……
    try {
        bb.put(src);
        bb.flip();
        // Do not update src until we see how many bytes were written
SocketChannel
SocketChannel是对传统的java socket API进行了封装和改进 ,即通过buffer支持了非阻塞的读写, 以及双向读写能力。
常用方法
本身也是一个抽象类,提供了一些模板方法,也有一些公用方法。常用方法包括:
// 构造SocketChannel
public static SocketChannel open()
public static SocketChannel open(SocketAddress remote)
// 关闭
public final void close() throws IOException
// 链接校验
socketChannel.isOpen();  // 检测SocketChannel是否处于Open状态
socketChannel.isConnected();  // 检测SocketChannel是否已经被链接
socketChannel.isConnectionPending();  // 测试SocketChannel是否正在进行链接
socketChannel.finishConnect();  // 校验正在进行套接字的SocketChannel是否已经完成链接
// 非阻塞模式读写连接
public abstract boolean connect(SocketAddress remote) throws IOException;
public abstract int read(ByteBuffer dst) throws IOException;
public abstract int write(ByteBuffer src) throws IOException;
案例
public static void main(String[] args) throws IOException {
    // 从buffer写数据到socketChannel
    ByteBuffer buf = ByteBuffer.allocate(1024);
    // 首先调用open方法建立Channel,设置非阻塞模式
    SocketChannel socketChannel = SocketChannel.open(new InetSocketAddress("www.baidu.com", 80));
    socketChannel.configureBlocking(false);
    String newData = "new String to write to file ..." + System.currentTimeMillis();
    buf.put(newData.getBytes());
    buf.flip();
    // 写的时候要在循环里面执行
    while (buf.hasRemaining()) {
        socketChannel.write(buf);
    }

    // 从socketChannel读数据到buffer
    ByteBuffer readBuf = ByteBuffer.allocate(1024);
    // 使用空参open+connect与带参open效果一样
    SocketChannel readChannel = SocketChannel.open();
    readChannel.connect(new InetSocketAddress("www.baidu.com", 80));
    readChannel.configureBlocking(false);
    int read = socketChannel.read(readBuf);
    if (read == -1) {
        readChannel.close();
    } else {
        readBuf.flip();
    }
}
需要注意的是,在非阻塞模式下执行write(),防止write()未写入任何内容就返回了,所以在循环中使用write(),而同样的,在非阻塞模式下执行read(),防止未read()到任何内容就返回,要关注read()的返回值
源码走读
open(SocketAddress)
前面了解到使用open(SocketAddress)其实等价于open()+connect(),可以通过源码分析
if (remote instanceof InetSocketAddress)
    sc = open();
……
try {
    sc.connect(remote);
} catch (Throwable x) {
……
}
assert sc.isConnected();
return sc;可以看到其中也是先使用空参的open()方法,然后再通过connect()方法连接
connect()方法实际上就是封装了Socket的内容
read(ByteBuffer)/write(ByteBuffer)
SocketChannel读写取是对Socket的包装,包装逻辑是与FileChannel差不多的,以read()方法为例
readLock.lock();
try {
    ensureOpenAndConnected();
这一部分通过ReentrantLock做同步控制,同时先确认Socket状态
n = IOUtil.read(fd, buf, -1, nd);读取也是委托给IOUtil方法,其中fd也是FileDescriptor类
read(ByteBuffer[])/Write(ByteBuffer[])
Channel具有Scatter/Gather分散聚集能力,即支持将多个buffer数据写入一个channel,也支持将一个channel的数据读到多个buffer
这个能力经常用于需要将传输的数据分开处理的场合,例如传输一个有消息头和消息体组成的消息,可以将消息头和消息体分散到不同的buffer中,方便分开处理
用于一个简单的案例看下:
public static void main(String[] args) throws IOException {
    SocketChannel socketChannel = SocketChannel.open(new InetSocketAddress("www.baidu.com", 80));
    ByteBuffer readBuffer1 = ByteBuffer.allocate(256);
    ByteBuffer readBuffer2 = ByteBuffer.allocate(1024);
    ByteBuffer[] readBuffers = {readBuffer1, readBuffer2};
    socketChannel.read(readBuffers);
    ByteBuffer writeBuffer1 = ByteBuffer.allocate(256);
    ByteBuffer writeBuffer2 = ByteBuffer.allocate(1024);
    ByteBuffer[] writeBuffers = {writeBuffer1, writeBuffer2};
    socketChannel.write(writeBuffers);
}可见Channel的read和write方法本身也支持以ByteBuffer[]形式传入数据,以read方法为例看下:
Objects.checkFromIndexSize(offset, length, dsts.length);
readLock.lock();
try {
    ensureOpenAndConnected();
……
n = IOUtil.read(fd, dsts, offset, length, nd);首先是做了一下长度判断,后面和read(ByteBuffer)方法一致,委托给IOUtil#read()处理
static long read(FileDescriptor fd, ByteBuffer[] bufs, int offset, int length,
                 boolean directIO, boolean async,
                 int alignment, NativeDispatcher nd)
    throws IOException
{
    ……
    while (i < count && iov_len < IOV_MAX) {
        ByteBuffer buf = bufs[i];
可以看到里面循环给每个buffer赋值的
ServerSocketChannel
ServerSocket是NIO中监听新进来的TCP连接的通道,是对标准IO中ServerSocket的封装和加强。可以设置非阻塞模式
案例
public static void main(String[] args) throws IOException {
    // 使用open()打开socket
    ServerSocketChannel serverSocketChannel = ServerSocketChannel.open();
    // 使用bind方法绑定目标
    serverSocketChannel.socket().bind(new InetSocketAddress("www.baidu.com", 80));
    // 也可以设置非阻塞
    serverSocketChannel.configureBlocking(false);
    while (true) {
        SocketChannel channel = serverSocketChannel.accept();
        // doSomthing with channel

        if (serverSocketChannel != null) {
            // 关闭
            serverSocketChannel.close();
        }
    }
}
选择器Selector
selector提供的是一个线程管控多个通道的并发能力。其并发的级别还在java的多线程之下
它的思路是让多个channel在selector上进行注册,然后调用select()方法,检查所有被注册的通道,选择已经就绪的通道执行操作
案例
使用Selector构造一个服务端监听
public class MyTest {

    private Selector selector;

    public static void main(String[] args) throws IOException {
        MyTest myTest = new MyTest();
        myTest.listen();
    }

    public void listen() throws IOException {
        ServerSocketChannel serverSocketChannel = ServerSocketChannel.open();
        // 这里直接监听本地的8080端口
        serverSocketChannel.socket().bind(new InetSocketAddress(8080));
        serverSocketChannel.configureBlocking(false);
        selector = Selector.open();
        serverSocketChannel.register(selector, SelectionKey.OP_ACCEPT);

        while (true) {
            int select = selector.select();
            if (select == 0) {
                continue;
            }
            Set<SelectionKey> selectionKeys = selector.selectedKeys();
            Iterator<SelectionKey> iterator = selectionKeys.iterator();
            while (iterator.hasNext()) {
                SelectionKey key = iterator.next();
                if (key.isAcceptable()) {  // 客户端则为isConnectable
                    // 表示是客户端请求事件,可以建立连接
                    ServerSocketChannel ssc = (ServerSocketChannel) key.channel();
                    // 获取客户端连接的通道
                    SocketChannel channel = serverSocketChannel.accept();
                    // 设置为非阻塞
                    channel.configureBlocking(false);
                    // 向客户端发送数据源
                    ByteBuffer buf = ByteBuffer.allocate(1024);
                    String message = "你好我是服务器端,我接收到了你的消息";
                    buf.put(message.getBytes(StandardCharsets.UTF_8));
                    // 把缓冲区切换成读取模式
                    buf.flip();
                    // 将buffer写入channel
                    while (buf.hasRemaining()){
                        channel.write(buf);
                    }
                    //和客户端连接成功后,为了接收到客户端的信息,需要给通道设置读取权限
                    channel.register(this.selector,SelectionKey.OP_READ);
                } else if (key.isReadable()) {
                    // 表示可以读取数据
                    // 得到事件发生的socket通道
                    SocketChannel channel = (SocketChannel) key.channel();
                    // 创建读取的缓冲区
                    ByteBuffer buffer = ByteBuffer.allocate(1024);
                    // 将数据读取到缓冲区
                    channel.read(buffer);
                    // 把缓冲区切换成写出模式
                    buffer.flip();
                    String rs = new String(buffer.array(),0,buffer.remaining());
                    System.out.println(rs);
                }
            }
        }
    }
}
对于NIO的一些深入思考
所有的系统I/O都分为两个阶段:等待就绪和操作。举例来说,读函数,分为等待系统可读和真正的读;同理,写函数分为等待网卡可以写和真正的写。
需要说明的是等待就绪的阻塞是不使用CPU的,是在“空等”;而真正的读写操作的阻塞是使用CPU的,真正在”干活”,而且这个过程非常快,属于memory copy,带宽通常在1GB/s级别以上,可以理解为基本不耗时。
传统的BIO里面socket.read(),如果TCP RecvBuffer里没有数据,函数会一直阻塞,直到收到数据,返回读到的数据。
对于NIO,如果TCP RecvBuffer有数据,就把数据从网卡读到内存,并且返回给用户;反之则直接返回0,永远不会阻塞。
而因为NIO的读写函数可以立刻返回,这就给了我们不开线程利用CPU的最好机会:如果一个连接不能读写(socket.read()返回0或者socket.write()返回0),我们可以把这件事记下来,记录的方式通常是在Selector上注册标记位,然后切换到其它就绪的连接(channel)继续进行读写。
这样,NIO就使得传统的BIO启用大量线程阻塞等待的套路变成了变成了单线程轮询事件,除了事件的轮询是阻塞的(没有可干的事情必须要阻塞),剩余的I/O操作都是纯CPU操作,没有必要开启多线程。
参考文档
https://tech.meituan.com/2016/11/04/nio.html
评论区